Silhouette software is essential for anyone who does any designing or some crafts making. The current version used frequently is the Silhouette Studio Software. Both pros and amateurs are served by this service. It aids in creating patterns and cutting files. You can also print the results.
This blog serves as a simple guide to Silhouette software. It covers Silhouette Studio’s layout and key features. By the end, you’ll be ready to start your creative journey. Discover the Silhouette design software. Its features boost your crafting. This guide is brief and clear, covering essential tools and processes. It also shows you how to start with the Silhouette series.
Understanding the Software of Silhouette Studio
What is Silhouette Studio?
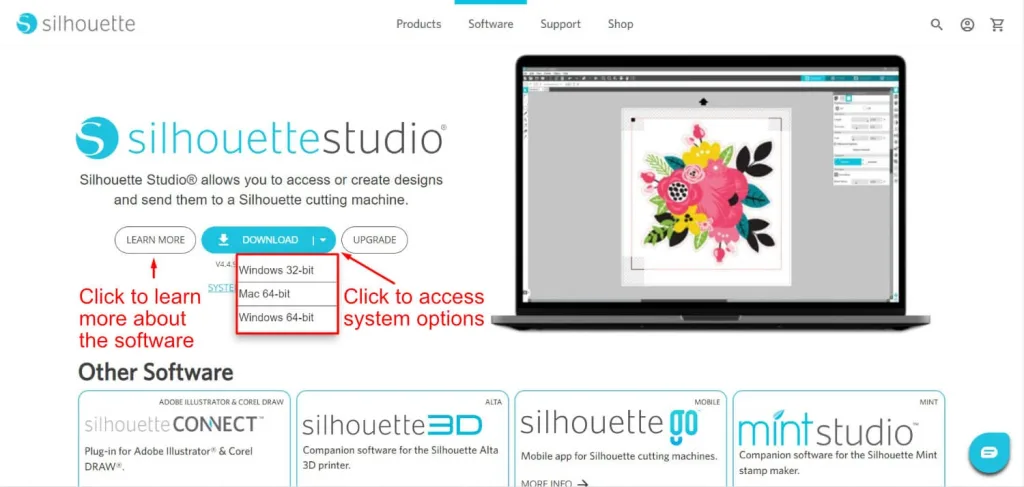
Silhouette Studio is actually an extremely strong design program. Using this application, you can also import and modify designs that will be cut by cutting machines such as the Silhouette CAMEO. The software comes in several versions: There is the free, the designer, and the business version. In our case, the free silhouette software is the best one, especially for new users. It has many features. The paid options available are then other options for the more advanced users.
Why Use Silhouette Software?
There are several persuasive arguments outlined by Silhouette software on why users should make the best of such software.
- Versatile Design Capabilities: Extraordinary among the characteristics of the Silhouette Studio software is the customization of designs by shapes, texts, as well as images. Thanks to flexibility, ideas belonging to the crafters can be implemented, which makes it universal for any project.
- User-friendly Interface: The operation of the best Silhouette software is smooth and gentle since it comes with a straightforward GUI for simple usage. It increases user convenience regarding tools and features, which decreases efforts and contributes to an efficient study process.
- Cutting Capabilities: This software, Silhouette Studio, can be used to cut designs on its Silhouette cutting machines. It works such that the overall workflow and development experience is smooth, thus enhancing efficiency.
- Expansion Resource: The software also has numerous tutorials and user forums. The given resources help the users with issues related to troubleshooting questions and building skills. This greatly facilitates the management and control of software.
Silhouette Software for Beginners
Installation
If you want to start using the Silhouette Studio software today, check it out by following this link – www.SilhouetteAmerica.com. It is fairly trouble-free when it comes to installation.
- Visit the Silhouette America website.
- Select whichever is relevant to your choice, coming in with a Basic account being free.
- Read the directions on the page and properly fit the software on your computer.
Interface Review
When running Silhouette Studio, some critical areas that we encounter include;
- Design Area: A place for design making and usage.
- Library: Location for designing and having the images you want to be displayed.
- Shop: Get more information about design resources and materials.
- Submission Panel: When you want to cut your design, it is time to control your cutting settings.
Central Tasks and Responsibilities of Silhouette Studio
It is good to realize that in order to make designs properly, one has to know at least the basics of using Silhouette Studio software. Below is a function and general explanation table.
| Function | Description |
| Select | To move or modify a design piece, click on it. |
| Group/Ungroup | Combine multiple elements or separate them for individual editing. |
| Import Files | Open various file types (e.g., .studio, .png, .jpeg) into the design area. |
| Draw Shapes | Use shape tools to create basic geometric forms. |
| Text Tool | Add text elements using various fonts available in the software. |
Basic Tools in Silhouette Studio
Here are some of the basic tools that are available in Silhouette Studio:
Drawing Tools
These include the drawing tools that are crucial when individualizing the decals in the Silhouette Studio.
- Shape Tools: First, draw some of the simplest geometric shapes, known as circles, squares, and rectangles, onto your design.
- Freehand Tool: This basic shape tool allows one to sketch directly on the canvas and comes in handy because you do not have to stick to shapes or objects.
- Text Tool: It can be used to insert text so that you can use different standard fonts to write the text needed or put a suitable logo.
Editing Tools
Graphic tools are important for polishing the products, and it is only possible to imagine working on designs with them.
- Select Tool: With this, individual elements placed within the design can be left-clicked in order to manipulate their conditions.
- Align Tool: Utilize this feature so that various aspects of the graphic are well laid and match well, hence giving your design a good touch.
- Fill Color Options: Allows a user to easily modify the color of shapes or text, which can be useful to change instances on one artwork easily.
This, in turn, entitles you to be able to effectively implement such creative concepts as seen below!
Process Associated with Silhouette Studio
The steps to use the Silhouette Studio software are as follows:
Opening Files
Basically, when you start working on Silhouette Studio, you can open a file using the option file or by just dragging and dropping the files to the designing area. It enables working with native .studio files and also with PNGs, JPEGS, and DXFs to provide diverse options for a logo’s design.
Creating Designs
Once your files are open, you begin the creation of designs using the tools that are provided in the software. These tools allow you to draw shapes from scratch or use images that you place upon which the program traces for more complex designs. Moreover, in the text tool, you can test various fonts and stylists, which is a nice bonus in terms of creativity.
Sending Designs to Cut
When you are ready to take your designs into production, navigate yourself to the Send pane. You can choose your cutting machine type and make a corresponding setting depending on the used material here. This will help you to arrive at the precise fit and personal shape without waste, which, in turn, makes the transfer from design to manufacturing very easy.
Tips for Beginners
Using Silhouette design software can be very fulfilling. But you should avoid some mistakes. Here are some helpful tips for beginners:
- Start Simple: The first step in the activity is to work with basic shapes and text figures. It also lets you take your time with the software’s tools and functions. This way, you’ll be comfortable and confident using them. As soon as you start feeling more confident you should go to more detailed designs.
- Save Frequently: A common mistake that kills productivity is forgetting to save. Always save your projects, especially after major changes. Following this practice will help avoid frustration and the use of such creativity.
- Use Tutorials: You can find many tutorials for Silhouette Studio online. This chapter covers those on YouTube and crafting blogs. It’s aimed at all skill levels. These resources offer best practices and new ideas to enhance your experience.
Conclusion
Starting a journey with the Silhouette software is very exciting. It can also be a bit confusing. So, as a basic guideline, get to know Silhouette Studio. Learn its functions, interface, and tools. That’s enough to see its possibilities like with any tool, practice and be patient.
Feel free to explore the features as you get more confident with this advanced software. This first-timer’s guide will help you. It is your best path to mastering one of the best Silhouette software tools on the market today!