Hard Disk Drives (HDDs) or (SSDs) play an important role while computing and managing your data. Disk Drives are of different file sizes, formats, speeds, and types depending on the make and model.
SSDs have taken over the charge of data storage and are much faster and efficient in terms of performance. Managing disk drives can be a tedious task in huge organizations where a lot of data servers are in use and you can’t miss out on your data.
If you wish to move a dynamic disk, you need to follow a step-by-step process on how to move dynamic disk drives and ensure data security.
Disk File Formats
You will find different disk file formats for different purposes and device needs.
- exFAT (Extensible File Allocation Table): Is a Read/Write disk format for Windows and MacOS
- NTFS (Windows NT File System): This is the most common file format with Read/Write capabilities on Windows Platform. Third-party software is required to use NTFS support on a Mac.
- HFS+ (Hierarchical File System, Mac OS Extended): Is a Read/Write File Format for up to Mac OS X Sierra version. It is used to configure local Time Machine backups.
- APFS (Hierarchical File System, Mac OS Extended): Is a Read/Write HFS+ on MacOS versions above Sierra. It is used to configure local Time Machine backups.
How to Move Dynamic Disk Manually
Microsoft Windows operating system comes with multiple useful utilities and one of them is the Disk Management Tool. This utility helps you create, manage, or remove disk partitions and apply effective resource techniques. You can convert dynamic disk to a basic disk or Extend C Drive Partition Volume if you are running out of space.
Remove Disk
Step 1. Click on the Start button and type Disk Management in the search box. Select Create and Format Hard Disk Partitions option from the search results. You can also press (Win + R) to open the Run command box, type diskmgmt.msc, and hit the Enter key.
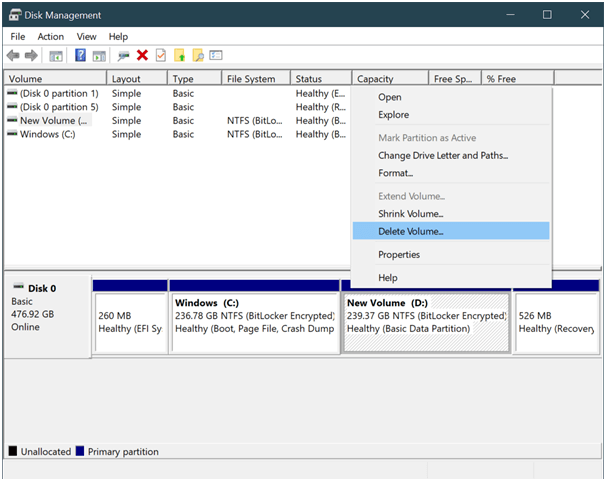
Step 2. Right-click on the disk you wish to move and click on the Delete Volume/Remove Disk option.
Step 3. If the disk is internally connected to the PC, turn off the PC and remove the disk. If it’s an external drive, you can directly remove the disk.
Install Disk
Step 4. If it’s an external disk, connect it to the new computer. If you need to connect it to a PC, turn OFF the PC, connect the disk and then turn it back ON.
Step 5. If you come across the Found New Hardware wizard, follow the onscreen instructions to initialize the disk.
Detect New Disk
Step 6. Once you move Dynamic Disk, it’s time to get it detected. On the new computer, press (Win + R) to open the Run command box, type diskmgmt.msc, and hit the Enter key. This will open the Disk Management utility.
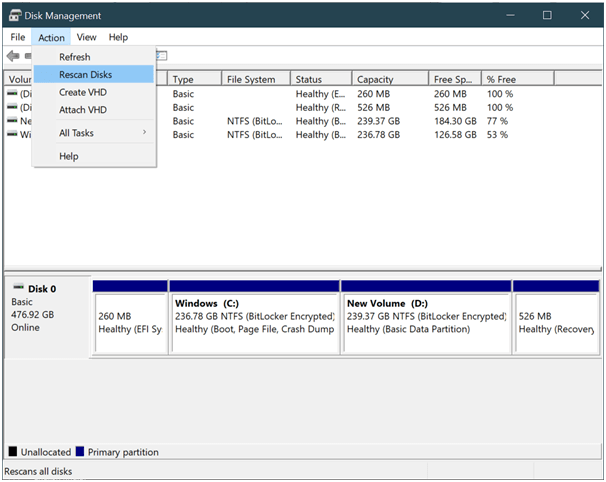
Step 7. Click on the Action menu on the top and select Rescan Disk.
Step 8. Right-click any disk that is marked as Foreign and click on the Import Foreign Disk option. Follow the on-screen instructions to finish moving a dynamic disk.
How to Move Dynamic Disk with EaseUS
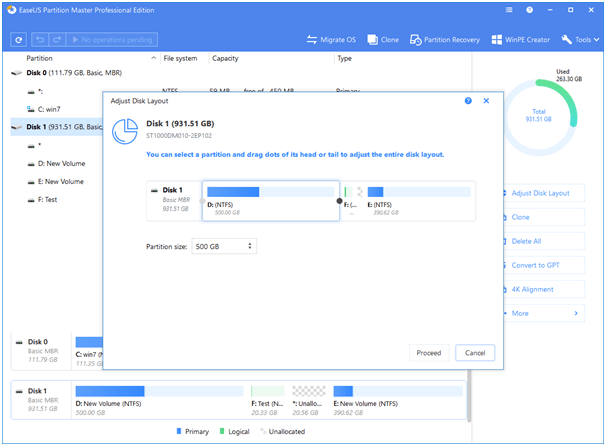
EaseUS Partition Master is one of the best disk management tools that you can use to manage your disk partitions. You can convert dynamic disk to basic without losing data, extend C: Drive in Windows 10 if you are running out of space, and perform many other tasks related to disk management.
EaseUS Partition Master allows you to Resize / Merge / Move / Create / Format / Delete / Clone / or Copy disk partition without compromising your data. If you have purchased a new SSD for your computer, this tool is efficient enough to migrate your entire data including the OS files and image to the new SSD.
It ensures that you do not compromise on a single file during this transition.
Step 1. Connect the Dynamic Disk on your new computer where you wish to move the data and turn ON your computer.
Step 2. Download and install EaseUS Partition Master from the official websites. You can also convert MBR System Disk to GPT Partition without any Data Loss on the same console.
Step 3. Once you open the console, it will list out all the disk partitions available on the computer including the new Dynamic Disk. It might display Foreign Disk in front of the newly attached disk.
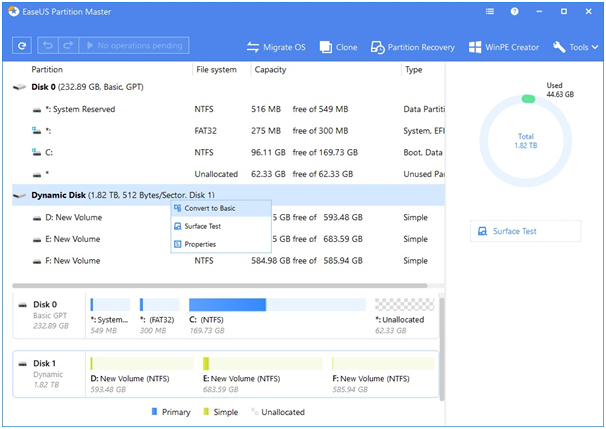
Step 4. Right-click on the disk and click on the Convert to Basic option. Click on the Okay button for confirmation.
Step 5. On the top-left of the console, click on the ‘Execute 1 Operation’ button and click on the ‘Apply’ button to initialize the disk. This operation will move the dynamic disk to a new computer and change it to a basic disk format.
“Please Note: Importing foreign disk doesn’t compromise your data on all new versions of Windows operating system except for Windows XP. If you do not see options to convert a dynamic disk to a Basic disk, you will need to use the Disk Management console and go with the ‘Import Foreign Disks’ option.”
Summing Up
Managing and migrating data can be tactful and needs special attention. A single mistake can lead to corruption and the deletion of data. If you are unaware of how to move dynamic disks, you can take a reference from this article and understand the migration process. Follow the step-by-step process to move dynamic disk and ensure that your data is safe!